
Monday, 24 December 2012
Tuesday, 6 November 2012
Basic Coaling Stage
Even though steam passenger traffic to Alexandra ended many years before the close of the line in 1978, some coaling of the 'Ks' and 'Js' that were heading the excursion trains was necessary. So I decided to give Alexandra yard a very basic coaling stage, probably not very accurate, but to me it looks the part.

The chap sitting there upon the stage is apparently waiting patiently for some shovels to arrive on a mixed goods from Melbourne. A nice long cuppa seems to be in order.....

Wednesday, 19 September 2012
THE Turntable
Earlier this year I was the happy recipient of a Steam Era Models 'J' Class locomotive, built for me by none other than Frank Kelly... a beautiful piece of work, which goes without saying. To my dismay, however, I had asked a little to much of her, wanting her to go happily around my 20" curves. We had tried the mechanism at an early stage on a sample radius and it seemed to work. The finished loco nevertheless just didn't have any side play in the drivers - which, I guess, is as it should be.

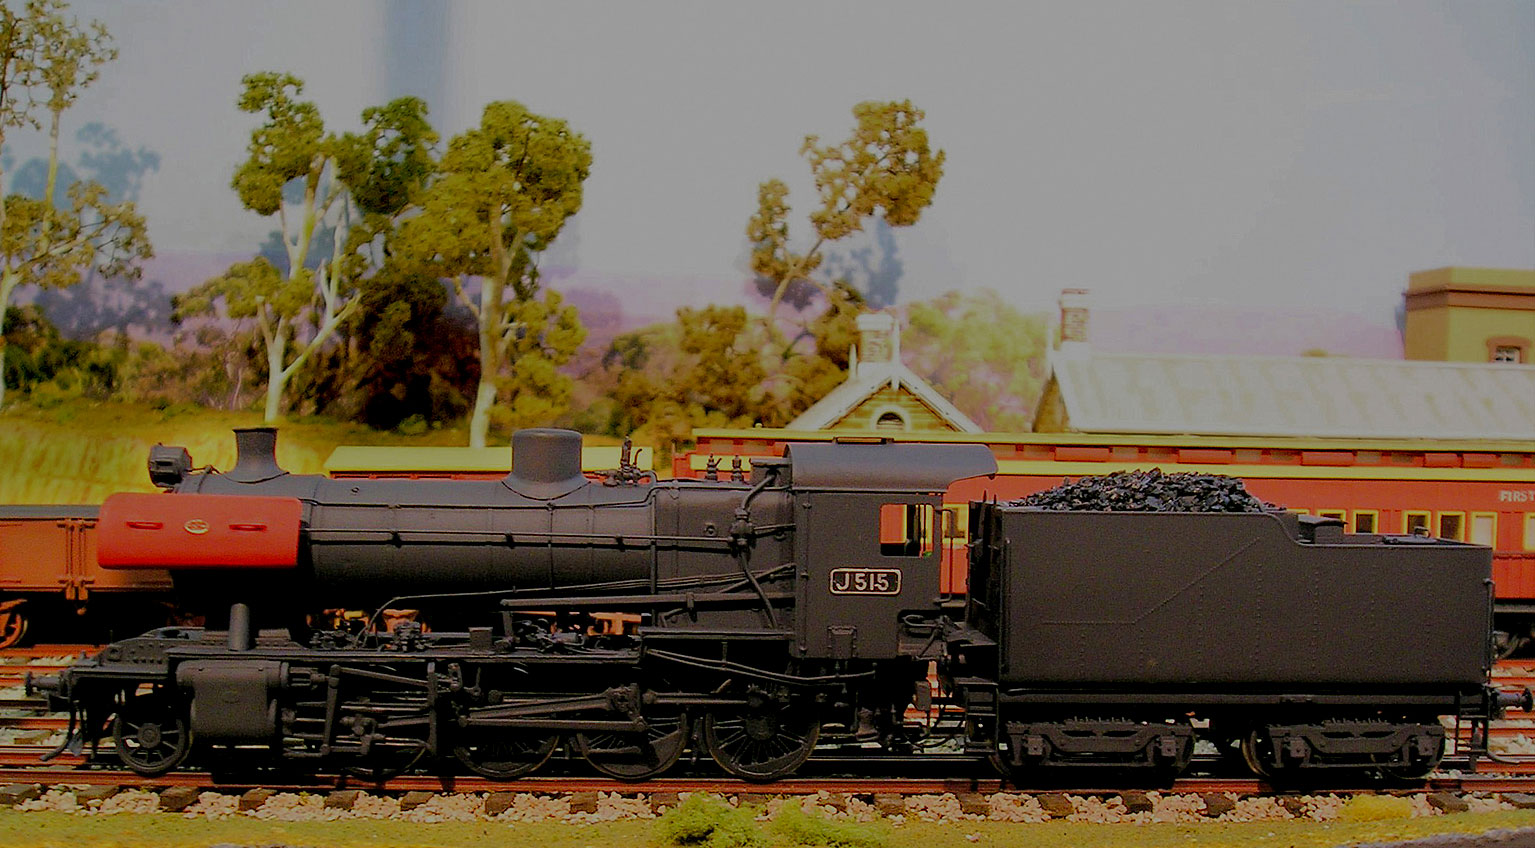
The result of this situation was that the loco had to be sold, which it duly was within 2 hours and it was replaced by Precision Scale Models J 529. She wasn't quite as nice as Frank's masterpiece, but I had to be practical. I later did the 'J' a good turn and increased the radii to 22" and 22 1/2" respectively.
Well, now there was a 'J' and it had to be turned at Alexandra. So, where to get a VR 53' turntable ? My butterfingers or the lack of skills would never produce one.After a fruitless search, when I nearly gave up, who should come to the rescue but another man of many talents, one Trevor Doran, the well known former proprietor of the 'Bufferstop'. He produced in no time at all a beautiful model that was operated by a little hand crank via an intricate set of gears. I decided on a little artistic, or rather practical licence for my own convenience and requested that the bridge should be a little longer, actually 56', in order to be able to place the loco more easily. I had no problem with this variance from the prototype.
All that was left for me to do was to place the turntable (unprototypically) at the Down end of Alexandra yard and landscape it. It looks very good to my eyes and I would like to express my thanks and appreciation to Trevor.


Tuesday, 21 August 2012
Alexandra - First Try
I intended the branch to Alexandra not to have Koriella station modelled , it was too short for that. Apart from dropping the line to Mansfield down below the baseboard by means of a deep cutting, which then would be suitably camouflaged, the Alexandra track would curve around the end of the peninsula and straighten into the yard of the terminus.
The fact that these radii (20") would turn out to be too tight for 'B' and 'J' classes was another story. I was now eager to concentrate on Alexandra. Here is the first (unfinished) version of that yard, when I still had no hope of ever having to accommodate an excursion train that might consist of at the very least 3 'W' coaches and a 'CE'. Thus the rather short Nr.1 road and platform.
.


I think for the moment we may have to ignore the fact that no 'B' Class ever went
to Alexandra
In my version of Alexandra , UP is to the left, when in reality it is to the right. The correct way would have meant putting the station building on the aisle side and again, as in Cathkin, I didn't like to have to look over the top of it. After all .....' it is my ... blah, blah ...'
At this time I also did have no idea whether I would ever have a turntable , or where to put it. It wouldn't be near the yard throat , as in real life - there was no room. It would have to be at the Down end. The station building is a laser-cut kit from Outback Models and a fine kit it is too. There are now some more outbuildings attached at the far end and I think there is only one toilet, but I chose to ignore unimportant (to me) nonsense like that ... 'After all......'
The shed (Bullamakanka , I think) turned out to be too large and would be replaced by an Outback Models one. The water tank (yet unfinished) is the well-known kit, which I managed to make two copies of for Yea.

The fact that these radii (20") would turn out to be too tight for 'B' and 'J' classes was another story. I was now eager to concentrate on Alexandra. Here is the first (unfinished) version of that yard, when I still had no hope of ever having to accommodate an excursion train that might consist of at the very least 3 'W' coaches and a 'CE'. Thus the rather short Nr.1 road and platform.
.

The platform and Nr. 1 road would eventually be lengthened to accommodate an excursion train consisting of AW - BW - ABW - CE with a 'J' Class being able to run around.

I think for the moment we may have to ignore the fact that no 'B' Class ever went
to Alexandra
At this time I also did have no idea whether I would ever have a turntable , or where to put it. It wouldn't be near the yard throat , as in real life - there was no room. It would have to be at the Down end. The station building is a laser-cut kit from Outback Models and a fine kit it is too. There are now some more outbuildings attached at the far end and I think there is only one toilet, but I chose to ignore unimportant (to me) nonsense like that ... 'After all......'
The shed (Bullamakanka , I think) turned out to be too large and would be replaced by an Outback Models one. The water tank (yet unfinished) is the well-known kit, which I managed to make two copies of for Yea.

Monday, 20 August 2012
Recapping so far...
Just a few images of the look of the layout at that stage.

However, some radical things have been happening. More shortly...
Tuesday, 5 June 2012
Cathkin Mark I
I had some difficulty from the beginning with having a loop of any useful size at Cathkin, but I had to work with the space available and pushed on undeterred. At the time I was only thinking of very short goods trains and rail motors. I would never have E carriages making up excursion trains , I thought.
As I mentioned before, I had decided to place the station building to the North of Nr.1 road. The goods shed was placed on the short siding on the South side. The level crossing was put immediately after the down points and the two roads to Alexandra and Mansfield were parting ways past that. It was all very tight. The crossing signs were put up and and a lot of vegetation put in. The bitumen road making its way towards Alexandra was looking good.. I'd printed out the road signs for the intersection with the road to Mansfield, but haven't made them yet. Anyway, here is Cathkin Mark I. There would, of course, be a Mark II. It was inevitable.
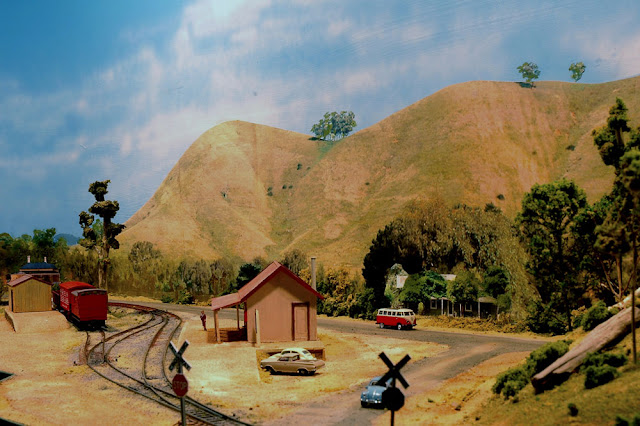

Moving towards Mansfield and Alexandra

Raw scenery with T358 negotiating 20 " radius , going from Alexandra to Cathkin around the penninsula. The road 'to Mansfield' drops into the inside cutting. This whole area would eventually have to be enlarged to accommodate 23" radii.
Early video
Wednesday, 2 May 2012
Pondering Cathkin.
Cathkin was the junction on the Goulburn Valley Highway where the track split into the Mansfield line continuing in a north - easterly direction and the Alexandra branch going towards the Southeast. There were three roads, one (livestock?) stub and a turntable off the Alexandra road, past the level crossing. I am not at all sure why Cathkin had a turntable, as both Mansfield and Alexandra had one and it seems pretty unlikely that trains regularly terminated at Cathkin. The only reason I can think of is that there could have been direct goods traffic between Mansfield and Alexandra and vice versa, in which case locos may have been turned at Cathkin, but it was never a terminus, as the line was immediately continued to Alexandra Road (Koriella).
Better informed heads than mine may be able to tell me the reason...
Having another look ...

(Thank you , Mark Bau)
Now, the thing for me to do was to decide how to deal with Cathkin. There would be no turntable, the only one would be at Alexandra, so the 'J' Class could be turned - should I ever be able to obtain anything that looked remotely like the VR prototype...(I eventually did get J529 from PSM!!)
The next thing that bothered me was the fact that both Cathkin and Alexandra stations were on the aisle (South) side of the layout.I didn't fancy the idea of looking over the top of them. So the decision was made to transfer both stations to the North of the line . In the case of Cathkin, I flipped the whole yard around. putting the goods shed onto the stub track. I also deleted Nr.3 road.
The only thing left to do was to take the Mansfield line, once it was past the level crossing, into a cutting, duly camouflaged, and take it underneath the layout and back all the way to 'Tallarook', 'Homewood' and back into Yea.
Cathkin diagram source: Mark Bau


Better informed heads than mine may be able to tell me the reason...
Having another look ...
Newsrail photo

(Thank you , Mark Bau)
The next thing that bothered me was the fact that both Cathkin and Alexandra stations were on the aisle (South) side of the layout.I didn't fancy the idea of looking over the top of them. So the decision was made to transfer both stations to the North of the line . In the case of Cathkin, I flipped the whole yard around. putting the goods shed onto the stub track. I also deleted Nr.3 road.
Cathkin diagram source: Mark Bau


Theory is a wonderful thing, but all this would have to be turned into reality.-
Wednesday, 25 April 2012
Crossing the River ...
One of the projects I was looking forward to were the bridges across the Goulburn at Molesworth, both road and rail. They run fairly close to one another, so I had little trouble placing them in the small amount of space I had. They are entirely scratchbuilt and a good likeness of the real ones, if somewhat shrunk. At first I mistakenly gave the railbridge one pylon to many , five in the river instead of four. Its girders were at different times painted grey or wagon red. I found a faded wagon red rather attractive.
The river itself was a little bit of a problem, as I had very little space between the top level and the hidden lower level that carried the return (runaround) track. I had to use a piece of sheetmetal for the riverbed. After the river was painted a muddy grey and two layers of Woodland Scenics water were applied and some fallen trees and debris added, I was quite happy with the result. I will probably add more vegetation along the banks.
The actual backdrop behind the bridges is really quite wooded, but I left it as I had painted it, with distant hills, as it gives the scene more depth.
The track from the bridge around towards Cathkin consists of a rather tight curve and gives me trouble once in a while, so this is something I may have to look at again in the future. The same thing applies to the curve in the opposite corner, leading from the Cheviot Tunnel into Molesworth.

It is time now to bravely move forward to Cathkin...
Monday, 16 April 2012
Faking it and tunnelling ...
As I decided on different projects along the line, I realized that some projects were going to require much more skill than others. One of the most difficult ones for me would be the station building at Yea.
It is a brick building and it would have to be scratchbuilt entirely. So I put it at the bottom of my list of things to do and, for the time being, decided to fake it ... Some time, when my skills had improved, I would tackle it. The yard at Yea is also very much a work in progress...

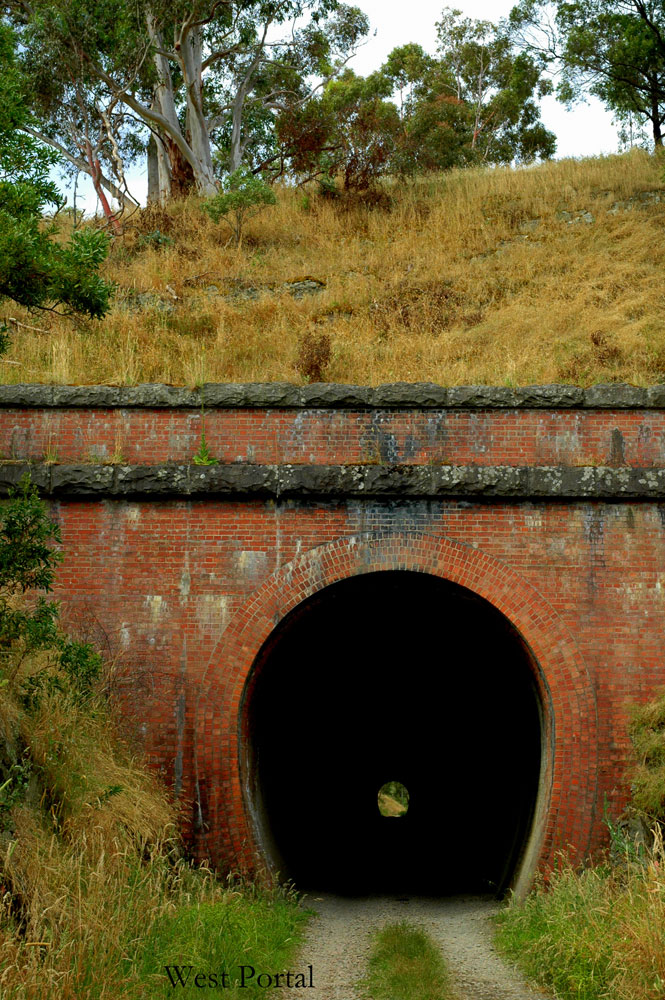
One of the things I was really looking forward to do was the Cheviot Tunnel. I had taken a number of photographs of both the up and the down side , and it seemed fairly easy to do in cardstock and brick paper. None of the brick paper I found though looked remotely like the Cheviot portals, so, in the end, I decided to do it photographically. I extended the brickwork on each side of the tunnel mouth in Photoshop, doubled the cardstock where there were rows of bluestone and carefully touched up the bricks and stonework that needed it and also shaded the bluestone, to give it a 3-dimensional effect.
The lining of the tunnel was easily achieved with homemade brick paper, using the same pattern, repeating and then printing it.
After the tunnel was put in place, I built the hills around it, combining them with the photographic back-drop. They are not as authentic as the hills at the rear of Cathkin would later be, but I am quite happy with the general impression of the area.


The fact that the real Cheviot Tunnel is situated some 8.7 km from Yea yard, rather than the scale
300 m it is on the layout, shall forever remain our secret.
It is a brick building and it would have to be scratchbuilt entirely. So I put it at the bottom of my list of things to do and, for the time being, decided to fake it ... Some time, when my skills had improved, I would tackle it. The yard at Yea is also very much a work in progress...

The lining of the tunnel was easily achieved with homemade brick paper, using the same pattern, repeating and then printing it.
After the tunnel was put in place, I built the hills around it, combining them with the photographic back-drop. They are not as authentic as the hills at the rear of Cathkin would later be, but I am quite happy with the general impression of the area.


The fact that the real Cheviot Tunnel is situated some 8.7 km from Yea yard, rather than the scale
300 m it is on the layout, shall forever remain our secret.
Thursday, 12 April 2012
Trouble ?
The question of what to do with the line from Cathkin to Mansfield was solved by simply taking it down into a cutting , making it disappear (heavily camouflaged again by shrubs and trees) letting it run underneath the baseboard , taking it back to the unseen Homewood, from where it would re-appear above ground (below) and re-enter Yea.

This would of course also provide me with a continuous run. I would have, in reality, a large oval, with a branch from Cathkin to Alexandra. So, the basic concept was established.
Then there was the problem of how big, or rather how small the radii were to be. The curves around the peninsula would take up a lot of room. I settled on a 20" radius, after I convinced myself via a mock-up that it could easily be managed by VR T Classes and DERMs and even a PSM 'J ' would get through. So I proceeded with construction, tracklaying (Peco Code 100 Flextrack and Peco Streamline points - largely medium - with Insulfrogs, with some long curved ones where necessary.
At the time my only locos were two Powerline 'T's. Had I had a 'B' Class then or even a DERM I may have proceeded differently. Not that people hadn't warned me. I, however, thought, while locos and passenger coaches (of which there would be only three or four, 'W's and a CE van) might not look too attractive around the curves, I could put up with that and went ahead.
Construction was completed , tracklaying and wiring done. As I intended to use the NCE controller for Digital Command Control I had bought at the 2011 Warrnambool show, I treated the whole layout as one large block. After all, it wasn't very big . Everything was working out fine, the 'T' locos felt right at home and I proceeded to work on my favourite aspect of the hobby - scenery.
I was having a wonderful time.....


But there was trouble ahead in the future. Trouble in River City, my friends, with a capital T...
***

T358 running light engine towards Yea near Homewood.
This would of course also provide me with a continuous run. I would have, in reality, a large oval, with a branch from Cathkin to Alexandra. So, the basic concept was established.
Then there was the problem of how big, or rather how small the radii were to be. The curves around the peninsula would take up a lot of room. I settled on a 20" radius, after I convinced myself via a mock-up that it could easily be managed by VR T Classes and DERMs and even a PSM 'J ' would get through. So I proceeded with construction, tracklaying (Peco Code 100 Flextrack and Peco Streamline points - largely medium - with Insulfrogs, with some long curved ones where necessary.
At the time my only locos were two Powerline 'T's. Had I had a 'B' Class then or even a DERM I may have proceeded differently. Not that people hadn't warned me. I, however, thought, while locos and passenger coaches (of which there would be only three or four, 'W's and a CE van) might not look too attractive around the curves, I could put up with that and went ahead.
Construction was completed , tracklaying and wiring done. As I intended to use the NCE controller for Digital Command Control I had bought at the 2011 Warrnambool show, I treated the whole layout as one large block. After all, it wasn't very big . Everything was working out fine, the 'T' locos felt right at home and I proceeded to work on my favourite aspect of the hobby - scenery.
I was having a wonderful time.....


But there was trouble ahead in the future. Trouble in River City, my friends, with a capital T...
***
Tuesday, 10 April 2012
Where, What and How ?
I decided early on that the short as well as infrequent trains running on the line were just right for a small layout like this. I would mainly run four-wheelers, pulled by T Class diesel locos, with the odd Y and a nice J steamer, if I could get one. A B Class diesel would also have to make an appearance, but it could go no further than Yea, as in real life. There would be an excursion train every now and then, consisting of W coaches, E cars being just too long. A CE luggage van could be added.
The sparse daily passenger traffic would be taken care of by some diesel-electric rail motors (DERMs) and perhaps a small Walker railmotor. The time I chose, seeing that the line was closed in 1978, was 1975, rather arbitrarily.
But what to do with the line to Mansfield?
The sparse daily passenger traffic would be taken care of by some diesel-electric rail motors (DERMs) and perhaps a small Walker railmotor. The time I chose, seeing that the line was closed in 1978, was 1975, rather arbitrarily.
***
When it came to the Junction at Cathkin, things became quite interesting. The branch to Alexandra was easy to do, going around the scenic divider to the other side of the peninsula.But what to do with the line to Mansfield?
Friday, 6 April 2012
The Beginning
I have taken an interest in the former VR line from Tallarook to Mansfield with the branch to Alexandra for some three years now. I tried to find out all I could about it and did about 6 months of concentrated research. It is amazing what you can find, if you only try.
 Area in pink to be modelled.
I wanted a layout that depicted as many features of the line as possible, without making it unrealistic. There was, of course, the question (as always) which section to model.
Yea station certainly had to be in it, as well as Alexandra, which was interesting as a terminus. Mansfield was not considered, as it was far too far away.
I came to the conclusion that it might be an interesting idea to have the junction of Cathkin as the focal point. The line would come up (heavily camouflaged) from underneath the baseboard somewhere in the Homewood area and enter Yea yard . Past Yea the next feature would be that wonderful Cheviot tunnel. From there we would move on to Molesworth, only a stone's throw away ( yeah, right ! ) and the Goulburn River with its rail- and road bridges.
From there we'll go on to the navel of this world - Cathkin. There wasn't much there really, the station, a loop, a goods shed , a turntable and the branch to Alexandra.
The branch I would model, with Alexandra , its yard and turntable. I also decided at this point, that I didn't really want to look over the top of either Cathkin station or Alexandra, so I flipped them around - they are now on the North side of the line - it is my layout after all!

Here is my working plan for the layout. The fact that some alterations were necessary and
made, I'll deal with in a later post.
Subscribe to:
Posts (Atom)