Wednesday 25 April 2012

Crossing the River ...

One of the projects I was looking forward to were the bridges across the Goulburn at Molesworth, both road and rail. They run fairly close to one another, so I had little trouble placing them in the small amount of space I had. They are entirely scratchbuilt and a good likeness of the real ones, if somewhat shrunk. At first I mistakenly gave the railbridge one pylon to many , five in the river instead of four. Its girders were  at different times painted grey or wagon red. I found a faded wagon red rather attractive.

The river itself was a little bit of a problem, as I had very little space between the top level and the hidden  lower level that carried the return (runaround) track. I had to use a piece of sheetmetal for the riverbed. After the river was painted a muddy grey and two layers of Woodland Scenics water were applied and some fallen trees and debris added, I was quite happy with the result. I will probably add more vegetation along the banks.

The actual backdrop behind the bridges is really quite wooded, but I left it as I had painted it, with distant hills, as it gives the scene more depth.

The track from the bridge around towards Cathkin consists of  a rather tight curve and gives me trouble  once in a while, so this is something I may have to look at again in the future. The same thing applies to the  curve in the opposite corner, leading from the Cheviot Tunnel into Molesworth.


It is time now to bravely move forward to Cathkin...


Monday 16 April 2012

Faking it and tunnelling ...

As I decided on different projects along the line, I realized that some projects were going to require much more skill than others. One of the most difficult ones for me would be the station building at Yea.
It is a brick building and it would have to be scratchbuilt entirely. So I put it at the bottom of my list of things to do and, for the time being, decided to fake it ... Some time, when my skills had improved, I would tackle it. The yard at Yea is also very much a work in progress...


One of the things I was really looking forward to do was the Cheviot Tunnel. I had taken a number of photographs of both the up and the down side , and it seemed fairly easy to do in cardstock and brick paper. None of the brick paper I found though looked remotely like the Cheviot portals, so, in  the end, I decided to do it photographically. I extended the brickwork on each side of the tunnel mouth in Photoshop, doubled the cardstock where there were rows of bluestone and carefully touched up the bricks and stonework that needed it and also shaded the bluestone, to give it a 3-dimensional effect.

The lining of the tunnel was easily achieved with homemade brick paper, using the same pattern, repeating and then printing it.

After the tunnel was put in place, I built the hills around it, combining them with the photographic back-drop. They are not as authentic as the hills at the rear of Cathkin would later be, but I am quite happy with the general impression of the area.


The fact that the real Cheviot Tunnel is situated some 8.7 km from Yea yard, rather than the scale
300 m it  is on the layout, shall forever remain our secret.


Thursday 12 April 2012

Trouble ?

The question of what to do with the line from Cathkin to Mansfield was solved by simply taking it down into a cutting , making it disappear (heavily camouflaged again by shrubs and trees) letting it run underneath  the baseboard , taking it back to the unseen Homewood, from where it would  re-appear above ground  (below) and re-enter Yea. 


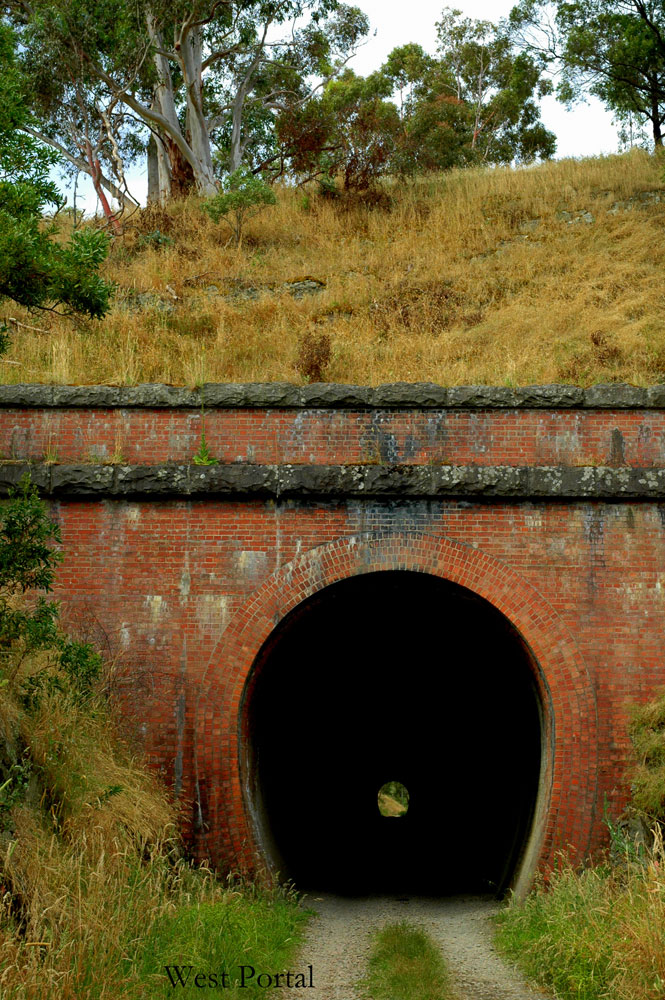
T358 running light engine towards Yea near Homewood.

 
This would of course also provide me with a continuous run. I would have, in reality, a large oval, with a branch from Cathkin to Alexandra.  So, the basic concept was established.


Then there was the problem of how big, or rather how small the radii were to be. The curves around the peninsula would take up a lot of room. I settled on a 20" radius, after I convinced myself via a mock-up that it could easily be managed by VR T Classes and DERMs and even a PSM 'J ' would get through.  So I proceeded with construction, tracklaying (Peco Code 100 Flextrack and Peco Streamline points - largely medium - with Insulfrogs, with some long curved ones where necessary.

At the time my only locos were two Powerline 'T's. Had I had a 'B' Class then or even a DERM I may have proceeded differently. Not that people hadn't warned me. I, however, thought, while locos and passenger coaches (of which there would be only three or four, 'W's and a CE van) might not look too attractive around the curves, I could put up with that and went ahead.

Construction was completed , tracklaying and wiring done. As I intended to use the NCE controller for Digital Command Control I had bought at the 2011 Warrnambool show, I treated the whole layout as one large block. After all, it wasn't very big . Everything was working out fine, the 'T' locos felt right at home and I proceeded to work on my favourite aspect of the hobby - scenery.

I was having a wonderful time.....


But there was trouble ahead in the future. Trouble in River City, my friends, with a capital  T...

                                                                       ***


Tuesday 10 April 2012

Where, What and How ?

I decided early on that  the short as well as  infrequent trains running on the line were just right for a small layout like this. I would mainly run four-wheelers, pulled by T Class diesel locos, with the odd Y and a nice J steamer, if I could get one. A  B Class diesel  would also have to make an appearance, but it could go no further than Yea, as in real life. There would be an excursion train every  now and then, consisting of W coaches, E cars being just too long. A CE luggage van could be added.

The sparse daily passenger traffic would be taken care of by some diesel-electric rail motors (DERMs) and perhaps a small Walker railmotor. The time I chose, seeing that the line was closed in 1978, was 1975,  rather arbitrarily.

***
When it came to the Junction at Cathkin, things became quite interesting. The branch to Alexandra was easy to do, going around the scenic divider to the other side of the peninsula.


But what to do with the line to Mansfield?


Friday 6 April 2012

The Beginning

I have taken an interest in the former VR line from Tallarook to Mansfield with the branch  to Alexandra for some three years now.  I tried to find out all I could about it and did about 6  months of concentrated research. It is amazing what you can find, if you only try.

                                                          Area in pink to be modelled.

I wanted a layout that depicted as many features of the line as possible, without making it unrealistic. There was, of course, the question (as always) which section to model.  
Yea station certainly had to be in it, as well as Alexandra, which was interesting as a terminus. Mansfield was not considered, as it was far too far away.

I came to the conclusion that it might be an interesting idea to have the junction of Cathkin as the focal point. The line would come up (heavily camouflaged)  from underneath the baseboard  somewhere in the Homewood area and enter Yea yard .  Past Yea  the next feature would  be that wonderful Cheviot tunnel. From there we would move on to Molesworth, only a stone's throw away ( yeah, right ! ) and the Goulburn River with its rail- and road bridges.

From there we'll go on to the navel of this world - Cathkin. There wasn't much there really, the station, a loop, a goods shed , a turntable and the branch to Alexandra.   

The branch I would model, with Alexandra , its yard and turntable. I also decided at this point, that I didn't really want to look over the top of either Cathkin station or Alexandra, so I flipped them around - they are now on the North side of the line - it is my layout after all!


Here is my working plan for the layout. The fact that some alterations were necessary and
made, I'll deal with in a later post.